DIY Remington 700 Timney Trigger Replacement Kit Safety Instructions
Introduction
Thank you for choosing the DIY Remington 700 Timney Trigger Replacement Kit. This guide provides essential safety instructions and guidelines to ensure the safe and effective use of the product. Please read this guide thoroughly before beginning installation or usage.
General Safety Guidelines
- Always handle firearms responsibly and in accordance with local laws and regulations.
- Ensure that your firearm is unloaded before beginning any work.
- Use appropriate personal protective equipment (PPE), such as safety glasses and gloves, when handling tools and parts.
- Keep the work area clean and organized to prevent accidents.
- Store all parts and tools out of reach of children and unauthorized users.
- Report any unsafe products or accidents to local authorities.
- Regularly check for recall updates on the EU’s Safety Gate platform.
Specific Safety Precautions for Use
- Ensure that the kit is complete before starting the installation. Missing parts can lead to improper installation and potential hazards.
- Be cautious when using tools, especially when driving pins and removing parts. Misuse can cause injury or damage.
- Avoid any modifications to the trigger or firearm that are not specified in the instructions.
- Do not attempt to install the trigger if you are unsure of the process. Seek assistance from a qualified gunsmith if needed.
- Always engage the safety mechanism on your firearm when working on it to prevent accidental discharge.
- After installation, test the trigger function in a safe environment before using the firearm for shooting.
Instructions for Installation and Usage
Installation Steps
Preparation
- Ensure your firearm is unloaded and pointed in a safe direction.
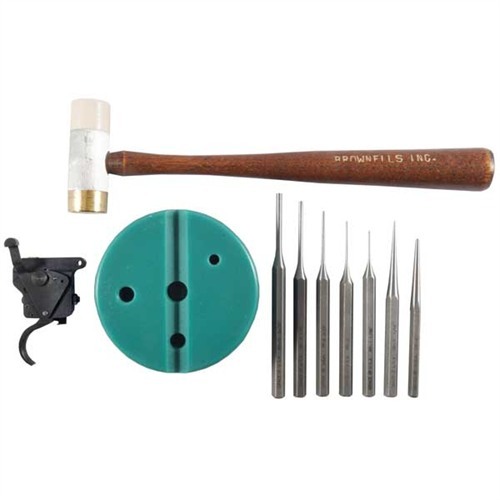
- Gather all tools and parts from the kit, including the Timney 510 trigger module, Brownells Rifle Bench Block, Grace pin punch set, and nylon/brass hammer.
Removing the Old Trigger
- Use the Grace pin punch set to drive out the pins holding the old trigger in place.
- Carefully remove the old trigger from the action.
Installing the New Trigger
- Position the Timney 510 trigger module in the action of the firearm.
- Use the pin punch set to tap the pins back in, securing the Timney trigger in place.
Final Checks
- Ensure the trigger is properly installed and functions correctly.
- Test the trigger in a safe environment before using the firearm for shooting.
PostInstallation
- After installation, always check the pull weight and adjust if necessary according to your preferences.
- Familiarize yourself with the new trigger's function and safety features to ensure proper operation.
Disposal Instructions
- Dispose of any packaging materials responsibly, following local recycling guidelines.
- If the trigger or any part of the kit becomes damaged, dispose of it in accordance with local hazardous waste regulations.
Contact Information for Further Support
For any questions or concerns regarding the installation or use of the DIY Remington 700 Timney Trigger Replacement Kit, please refer to the manufacturer’s website or contact their customer support for assistance.
Thank you for prioritizing safety and following these guidelines. Enjoy your upgraded shooting experience with the DIY Remington 700 Timney Trigger Replacement Kit!
 Help and contact






 Classical view
 Mobile view
